
Top Motorcycle GPS Mounts for Every Rider
A GPS screen can turn an unfamiliar ride into a calmer one, but only when it stays readable and secure. The right Motorcycle Gps Mount depends on your bike, device, handlebars, and typical routes. A compact commuter may need a simple clamp, while a touring rider might value vibration control and a charging option. Small details matter. Handlebar diameter, case thickness, and cable reach can all affect fit.
This guide compares mount styles for different riders, from quick-release cradles to adjustable, weather-resistant systems. It also considers how easily each design positions a screen near your natural line of sight without blocking instruments or controls. A mount should feel firm on rough pavement, yet remain practical when you park or change devices. Check the manufacturer’s fit guidance, tighten hardware as directed, and test the setup while stationary before riding. No mount removes every trade-off. Some sturdy designs take longer to install, and some convenient mounts may transmit more vibration than expected. That deserves a second look. The sections ahead explain what to compare, which features suit common riding needs, and how to choose a setup that works with your motorcycle rather than against it.
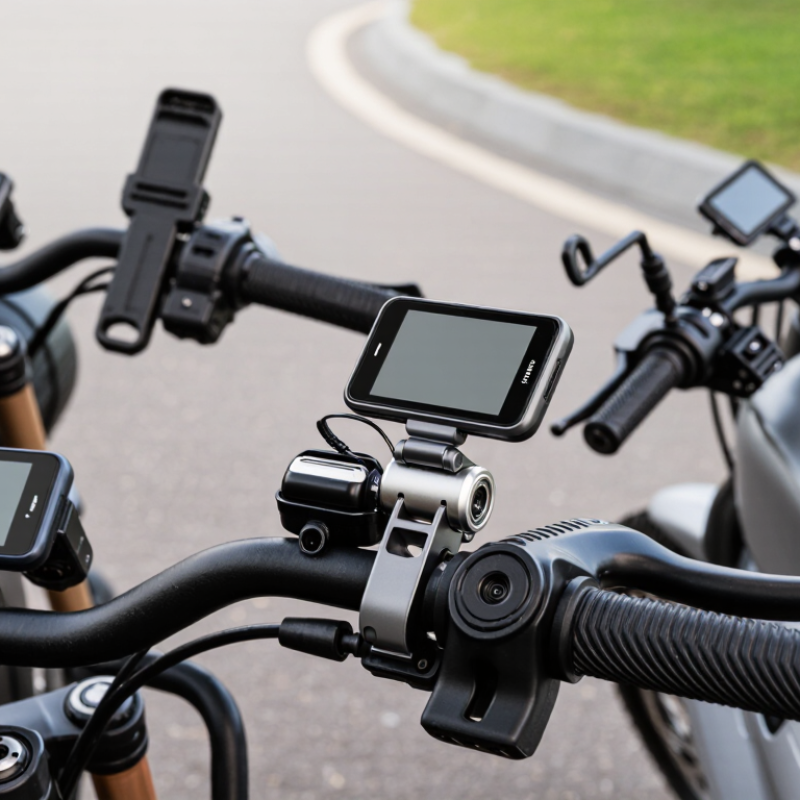
Understanding Motorcycle GPS Mount Types and Their Core Features
Motorcycle GPS mounts differ mainly in where they attach and how they hold a device. Handlebar clamps are common because they fit many cockpits and keep the screen within easy view. Ball joints allow angle changes, though loose joints can slowly shift over rough roads. Stem mounts suit some motorcycles with hollow steering stems, but fit depends on the bike’s design. Mirror-stem mounts can save handlebar space, yet may place the screen too far from a natural glance. Fit matters.
Cradle-style mounts grip a phone or navigation unit with adjustable arms; enclosed holders offer more protection from rain and dust. Check that controls and charging ports remain accessible. A snug fit should prevent rattling without pressing side buttons. Water resistance varies, so a mount alone should not be treated as weatherproof. Vibration dampening can reduce camera or screen shake, especially on uneven pavement, but it cannot eliminate every vibration.
Locking mechanisms help discourage accidental release, while a simple safety tether adds backup security. Before buying, compare the mount’s clamp range with your handlebar diameter and check clearance around cables and levers. Test the viewing angle while parked, then confirm it does not block instruments or distract you from the road. One detail is easy to overlook: gloves can make small adjustment knobs awkward. There is no perfect setup; a secure mount may still feel clumsy on a particular bike.
Assessing Compatibility, Stability, and Weather Resistance
Compatibility starts with the bike, not the phone. Check handlebar diameter, available clearance, and whether the clamp blocks cables or controls at full steering lock. A case-mounted cradle may fit neatly, yet add leverage that makes a heavy phone wobble over sharp bumps. Choose a short, rigid arm where possible, then test it on a rough road at low speed. It should stay readable without shifting. Small movement matters.
Stability is not just convenience. NHTSA recorded 6,218 motorcyclist deaths in the United States in 2022, a reminder that riders need to keep attention on traffic, not a vibrating screen (Traffic Safety Facts: Motorcycles, 2022). Set navigation before moving, and avoid adjustments while riding. Weather claims also need careful reading. IEC 60529 defines IP ratings; an IP67 device is dust-tight and tested for temporary immersion under specified conditions. That rating does not prove the mount, charging port, or exposed phone connection is equally protected. Rain can still creep along a cable. Look for sealed joints, corrosion-resistant hardware, and a tether that cannot reach the wheel. I would not trust a rating alone. Check the actual assembly after rain, because a mount can be sturdy and still leave one weak seam.
Comparing Mount Styles for Different Riders and Motorcycles
Choosing a motorcycle GPS mount depends less on appearance than on cockpit geometry, vibration, and how often directions need checking. A handlebar clamp keeps a phone close and adjustable, which suits upright commuters with open bars. On narrow handlebars, though, it can crowd switches or block the instrument panel. That matters. A fork-stem mount can center the screen on sport motorcycles, but may sit low when the rider leans forward. Mirror-stem mounts free handlebar space, although mirror movement and rough-road vibration can make the display harder to read.
Touring motorcycles often have room for a longer, adjustable arm, while compact dual-sports benefit from a mount that stays tucked away on bumpy trails. No position is perfect; even a clear screen can catch glare or feel awkward with gloves. Check the view and reach while parked, then make sure the mount does not interfere with steering or controls. The NHTSA’s 2022 Traffic Safety Facts reports that motorcyclists accounted for 15% of U.S. traffic fatalities, despite motorcycles representing 3% of registered vehicles. That statistic does not show that a particular mount prevents crashes. It does support keeping glances brief and attention on the road.
| Mount Style | Typical Attachment Point | Best Suited To | Main Advantages | Considerations | Installation Checks |
|---|---|---|---|---|---|
| Handlebar clamp | Clamps around a compatible section of the handlebar. | Standard and touring motorcycles with accessible handlebar space. | Usually easy to position and adjust; offers a clear view near the rider’s line of sight. | Can compete for space with controls, mirrors, handguards, or other accessories. Bar diameter and available clearance vary. | Confirm the clamp fits the bar diameter, does not obstruct controls, and stays clear of the tank and fairing through full steering movement. |
| Mirror-stem mount | Attaches at a compatible mirror stem or mirror mounting point. | Motorcycles with limited handlebar space and a suitable mirror-stem layout. | Can free up handlebar space and place the display near the rider. | Fit depends on the mirror thread, stem shape, and available clearance. Some arrangements may make the display more exposed to wind or vibration. | Check thread compatibility and ensure the mirror remains secure and correctly positioned after installation. |
| Clutch or brake reservoir mount | Uses a compatible fastener point on a handlebar-mounted fluid reservoir. | Street and touring motorcycles with accessible reservoirs and limited bar space. | Provides a compact mounting location close to the instruments. | Compatibility depends on reservoir shape and fastener spacing. Incorrect hardware or installation can interfere with safety-critical controls. | Use only a mount designed for the specific reservoir arrangement; do not disturb the reservoir seal, cover, or brake and clutch operation. |
| Steering-stem mount | Fits inside a compatible hollow steering stem or attaches to a suitable stem opening. | Sport and sport-touring motorcycles where handlebar space is restricted. | Offers a central position and can keep the device clear of some handlebar controls. | Not suitable for every steering stem; access and fit can vary, and the display position may be low or partially obscured. | Verify the stem’s internal dimensions and check that the mount does not interfere with steering movement or nearby components. |
| Crossbar mount | Clamps to a handlebar crossbar or accessory bar. | Adventure, dual-sport, and off-road motorcycles equipped with a compatible crossbar. | Can provide a sturdy central mounting point and may leave the main handlebar area available for controls. | Requires a crossbar with suitable diameter and enough room. A tall position may increase exposure to impacts or branches off-road. | Check clamp fit, cable clearance, and device security; inspect the setup regularly after rough-road riding. |
| Fairing or dashboard mount | Attaches to a suitable panel, bracket, or existing accessory point near the cockpit. | Touring and sport-touring motorcycles with a stable, accessible cockpit mounting location. | Can integrate the display into the instrument area and keep it out of the way of the handlebars. | Panel shape, visibility, heat, and vibration differ by motorcycle. Drilling or modifying bodywork may be required for some installations. | Check the manufacturer’s mounting guidance for the motorcycle, and confirm the device remains visible without blocking instruments or airflow. |
| Choosing a mount: Confirm compatibility with both the motorcycle and the navigation device. Allow for full steering movement, keep controls and instruments unobstructed, and use suitable vibration protection when recommended for the device. Recheck fasteners periodically, especially after long or rough rides. | |||||
Choosing a Mount Based on Riding Habits and Navigation Needs
Top Motorcycle GPS Mounts for Every Rider
The right motorcycle GPS mount depends less on appearance than on how, where, and how often you ride. A commuter crossing town may value a compact position that keeps the screen visible without crowding the instruments. Short trips, frequent stops. A touring rider faces different demands: vibration, changing weather, and long hours of checking directions make secure retention and easy adjustment more important.
Before choosing, sit on the bike in your normal riding posture and check the screen from your usual viewing position. You should be able to glance down briefly, not lean or twist to read it. Choose a base that fits the handlebar or designated mounting point, then check that it cannot rotate under firm hand pressure. A safety tether can add reassurance on rough pavement, but it should not obstruct controls or cables.
Navigation needs matter too. Riders following a route for hours may prefer an adjustable mount with vibration damping; occasional users may favor quick removal and fewer exposed parts. Check screen visibility in bright light, and test touch access with gloves if needed. No mount fixes poor placement. I still find this easy to overlook: a screen that looks centered while parked can feel awkward with a tank bag fitted. Recheck steering clearance and charging-cable slack before riding.
Top Motorcycle GPS Mounts for Every Rider
Compare common mount styles by riding need. Ratings are indicative guidance on a 1–5 scale, not results from a product test or rider survey.
Choose a mount that suits your bike and route: vibration-damped mounts can help protect a phone on rough roads, while locking mounts add security for frequent stops. Check handlebar or stem compatibility and follow the device maker’s vibration guidance.
Installing and Maintaining a Motorcycle GPS Mount
Choose a position you can see with a brief downward glance, without blocking the instrument panel or restricting handlebar movement. Sit on the bike and turn the bars fully in both directions before tightening anything. Check that cables, brake lines, and controls remain clear. Small details matter. Follow the mount maker’s torque guidance; overtightening can damage a clamp or handlebar. If the mounting surface is curved or unusually narrow, pause and check compatibility rather than forcing a fit.
Vibration is hard on screens and fasteners. Secure the device with its safety tether, if supplied, and inspect the mount after the first short ride. Then check it during routine cleaning for loose bolts, cracked rubber, or a slipping joint. NHTSA’s 2022 Traffic Safety Facts: Motorcycles reports 6,218 motorcyclist deaths that year, representing 15% of all U.S. traffic fatalities. That figure does not measure GPS-related risk, but it underlines why mounting should never compromise control or attention. Keep route changes simple and make them while stopped. I have to admit, a mount that feels solid in the driveway may still shift on rough pavement, so recheck it after a bumpy ride.
Article Source:
Submit a quote request or book a design consultation
Plastimold Products is an end-to-end product development and manufacturing team. We provide product design, engineering, prototyping, tooling, plastic injection molding, assembly, packaging and fulfillment. We work with any size company from start-ups to enterprises from all around the world.
I have a product I want to manufacture
I have a product that is already designed and now needs to be manufactured.
I need a manufacturer to optimize my product for injection molding, help choose the correct material, and manage the product production.
I have tooling that I want to transfer or modify, or I need to produce new tooling.
I need design and engineering support
I have a product concept that I want to be designed and brought to market.
I have a product that needs to be reviewed, improved or DFM’ed.
I am looking for a manufacturer to provide an end-to-end solution, from design and development to inventory, marketing, and sales.

©2022 Plastimold Products - Privacy policy - Terms and Conditions

